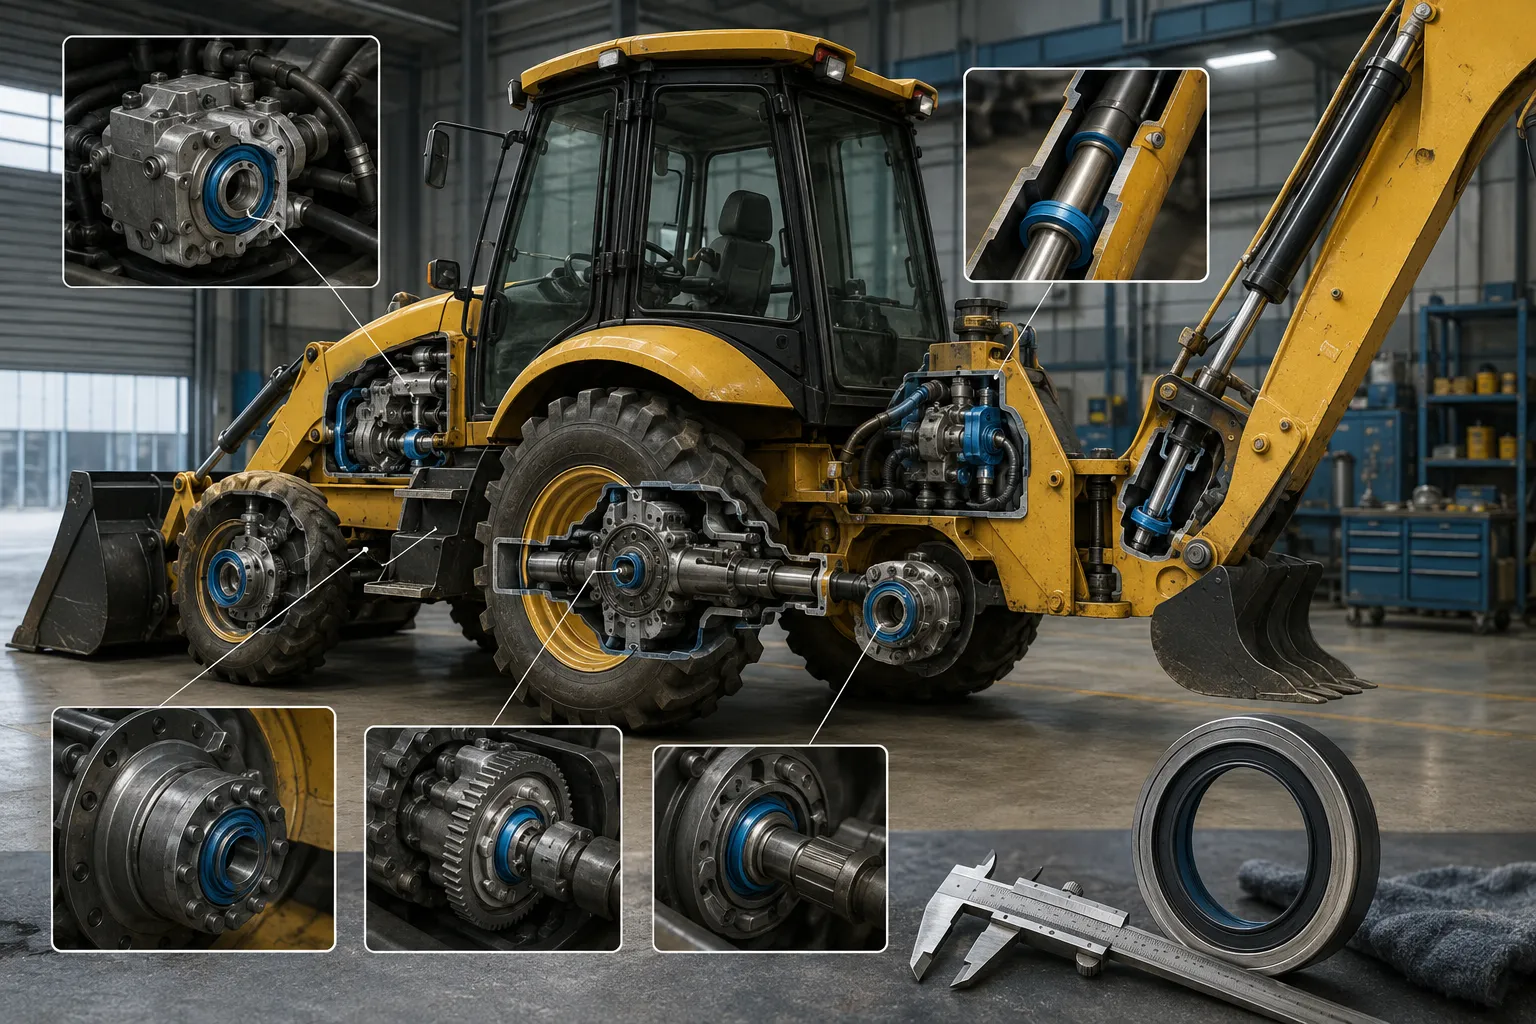
JCB equipment can use oil seals in many different assemblies, including wheel hubs, axles, differentials, gearboxes, hydraulic pumps, travel drives, engines, transmissions, and hydraulic cylinders.
That is why a request for a “JCB oil seal” is usually not enough to identify the correct replacement.
A backhoe loader, excavator, telehandler, skid steer, loader, or agricultural machine may use dozens of seals in different positions. Two seals used on the same machine can have completely different dimensions, materials, lip structures, pressure requirements, and installation directions.
The most reliable way to identify a replacement is to confirm the exact assembly, inspect the old seal where possible, measure the key dimensions, check the lip structure, and review the fluid, temperature, contamination, and shaft condition.
This guide uses JCB equipment as an application reference. The correct replacement should always be confirmed against the actual seal, equipment assembly, OEM reference, drawing, or measured dimensions.
Why a JCB Machine Model Alone Is Not Enough
A machine model can help narrow the search, but it does not always identify one exact oil seal.
The same equipment model may use different components depending on production year, engine option, transmission type, axle configuration, operating market, serial-number range, attachment type, or repair history.
For example, one JCB backhoe loader may have seals used in:
Front axle hubs
Rear axle hubs
Differential pinion area
Axle shaft locations
Gearbox output shafts
Transmission input or output areas
Hydraulic pump drives
Hydraulic cylinders
Engine crankshaft locations
Camshaft or timing-side locations
Steering components
PTO or attachment-drive systems
A seal may also have been replaced previously with an aftermarket alternative, a different lip design, or a different material.
For this reason, machine model information should be treated as supporting information rather than the only identification method.
A more reliable replacement process combines the machine model with the exact component location, old seal markings, dimensions, seal cross-section, and operating condition.
Common JCB Oil Seal Locations
Oil seals are used anywhere a rotating shaft must pass through a housing while retaining oil, grease, or hydraulic fluid.
Common seal locations on JCB equipment may include the following.
Wheel Hub and Wheel-End Seals
Wheel-end seals are used around rotating hub, axle, or bearing assemblies.
They may need to retain grease or gear oil while keeping out dust, water, mud, sand, and other abrasive contamination.
These seals are especially important on equipment operating in construction, agriculture, quarrying, landscaping, waste handling, and outdoor environments.
A wheel-end seal problem may show up as:
Oil or grease around the wheel
Wet brake or hub components
Dirt buildup around the hub
Lubricant loss from an axle housing
Repeated bearing damage
Water or mud contamination inside the hub area
Wheel-end applications may use more than a standard single-lip oil seal. Some assemblies require cassette-style seals, heavy-duty hub seals, multiple sealing lips, or additional contamination-exclusion features.
Axle Shaft and Differential Seals
Axle and differential seals help retain gear oil inside axle housings and differential assemblies.
Common locations include:
Axle shaft entry points
Differential side seals
Pinion seals
Output-shaft seals
Front axle housing locations
Rear axle housing locations
Driveshaft flange areas
A leak in this area may be confused with a hub leak, transmission leak, transfer-case leak, CV boot problem, or hydraulic fluid leak.
Before ordering a replacement, confirm where the fresh fluid first appears after the area has been cleaned.
Gearbox and Transmission Seals
Transmission and gearbox seals may be installed around input shafts, output shafts, selector shafts, drive shafts, or internal rotating components.
These seals can be exposed to:
Gear oil
Transmission fluid
Pressure variation
Shaft vibration
Elevated temperature
Heavy load
Dust and water exposure
Limited installation space
A gearbox or transmission seal must match more than the shaft size. The material, lip structure, housing fit, pressure condition, and installation depth can all affect performance.
Hydraulic Pump and Motor Seals
Hydraulic pumps and motors may use rotary shaft seals around drive shafts and other rotating connections.
These applications can involve:
Hydraulic fluid compatibility
Shaft speed
Pressure
Heat
Pump vibration
Limited lubrication during startup
Contamination risk
Critical installation requirements
A standard general-purpose oil seal may not be suitable for every hydraulic pump or motor application.
The seal type, material, shaft finish, pressure condition, and original design should be confirmed before replacement.
Hydraulic Cylinder Seals
Hydraulic cylinders normally use rod seals, piston seals, wipers, guide rings, backup rings, and static seals rather than a conventional rotary oil seal.
However, JCB equipment often uses many hydraulic cylinders, so seal-kit identification is a common maintenance requirement.
Cylinder seal-kit identification may require:
Cylinder bore diameter
Rod diameter
Seal groove dimensions
Piston design
Gland design
Hydraulic fluid type
Pressure condition
Rod-surface condition
Cylinder-bore condition
Wiper and guide-ring structure
A hydraulic cylinder seal kit should not be selected only by machine model or approximate cylinder size.
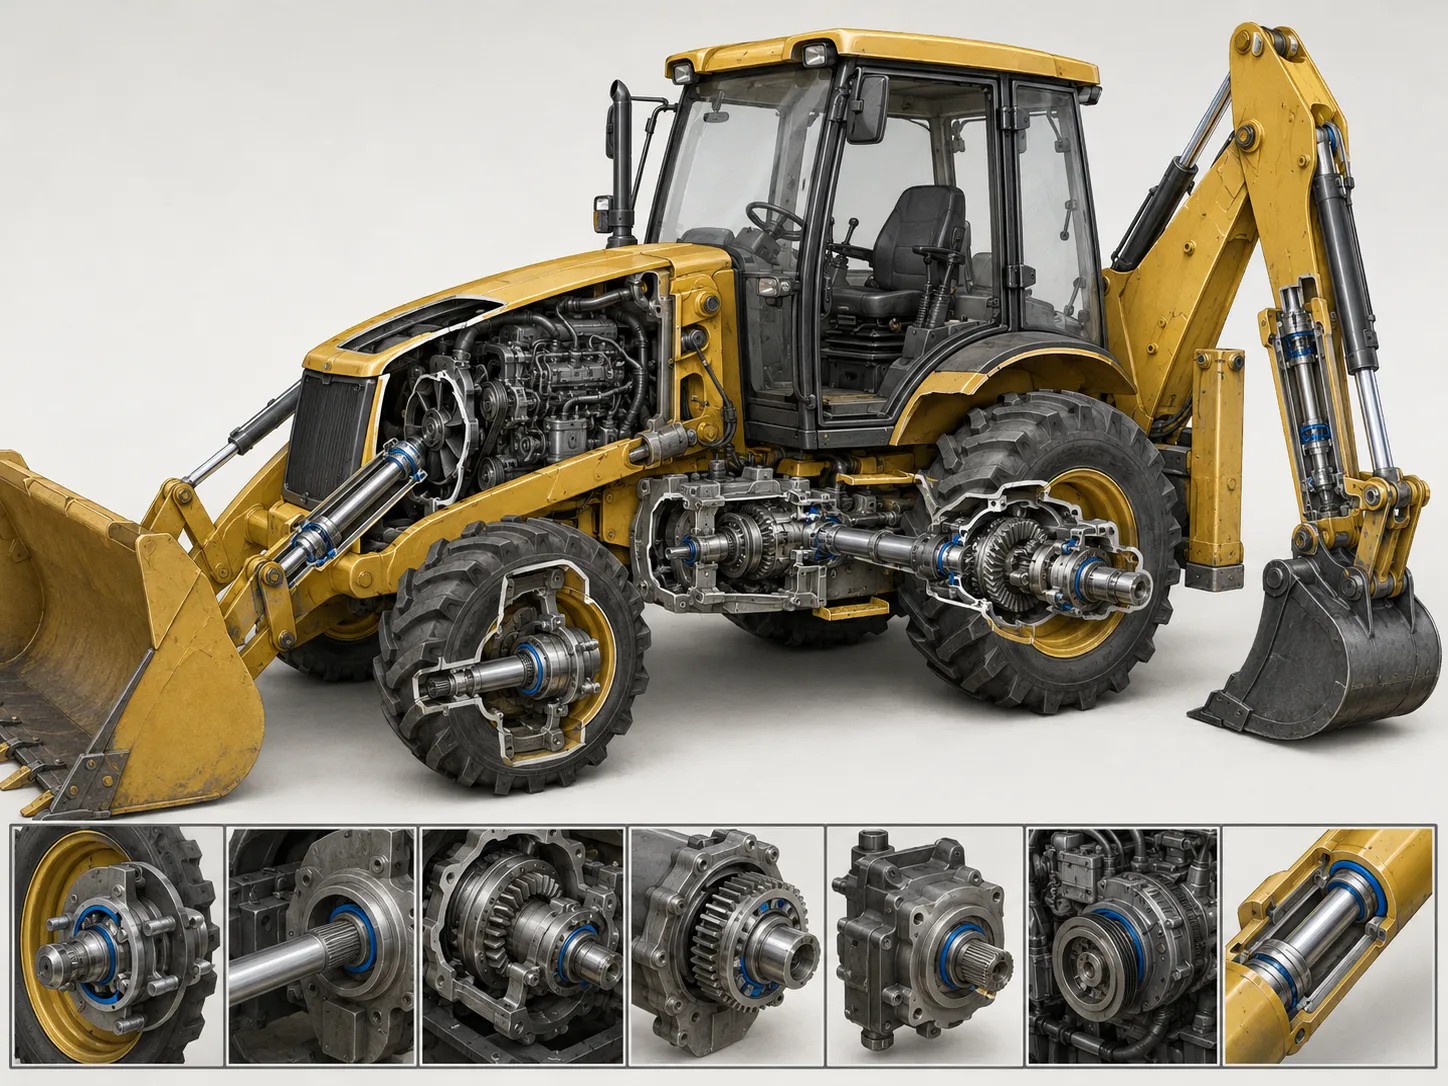
How to Identify the Exact JCB Oil Seal Location
Before measuring or ordering a seal, identify the exact assembly where the leak or failed seal is located.
A useful inspection process includes the following steps.
Step 1: Clean the Leak Area
Old oil, dirt, grease, and dust can make it difficult to identify the true source of the leak.
Clean the surrounding components carefully and inspect the area again after the machine has operated.
Fresh leakage is more useful than old oily dirt.
Step 2: Confirm the Type of Fluid
The fluid can help identify the affected system.
Check whether the leak appears to be:
Engine oil
Gear oil
Transmission fluid
Hydraulic fluid
Grease
Water-contaminated lubricant
A mixture of oil and dirt from an old leak
Do not assume that every dark or oily fluid is gear oil.
The fluid type can affect both the location diagnosis and material selection.
Step 3: Identify the Assembly
Confirm whether the leak is associated with:
Wheel hub
Axle
Differential
Driveshaft
Gearbox
Transmission
Hydraulic pump
Hydraulic motor
Hydraulic cylinder
Engine front cover
Timing area
PTO or attachment drive
Bearing housing
A photo showing the overall assembly and a close-up of the leak area is often more useful than a photo of fluid on the ground.
Step 4: Record Machine and Component Information
Useful identification details include:
Equipment model
Serial number or serial range where available
Production year
Engine model
Transmission type
Axle type
Assembly or component number
Existing OEM reference
Repair manual reference
Previous replacement-part information
Supplier code on the old seal
This information helps reduce the chance of matching a seal from the wrong version of the machine.
How to Measure a JCB Oil Seal Correctly
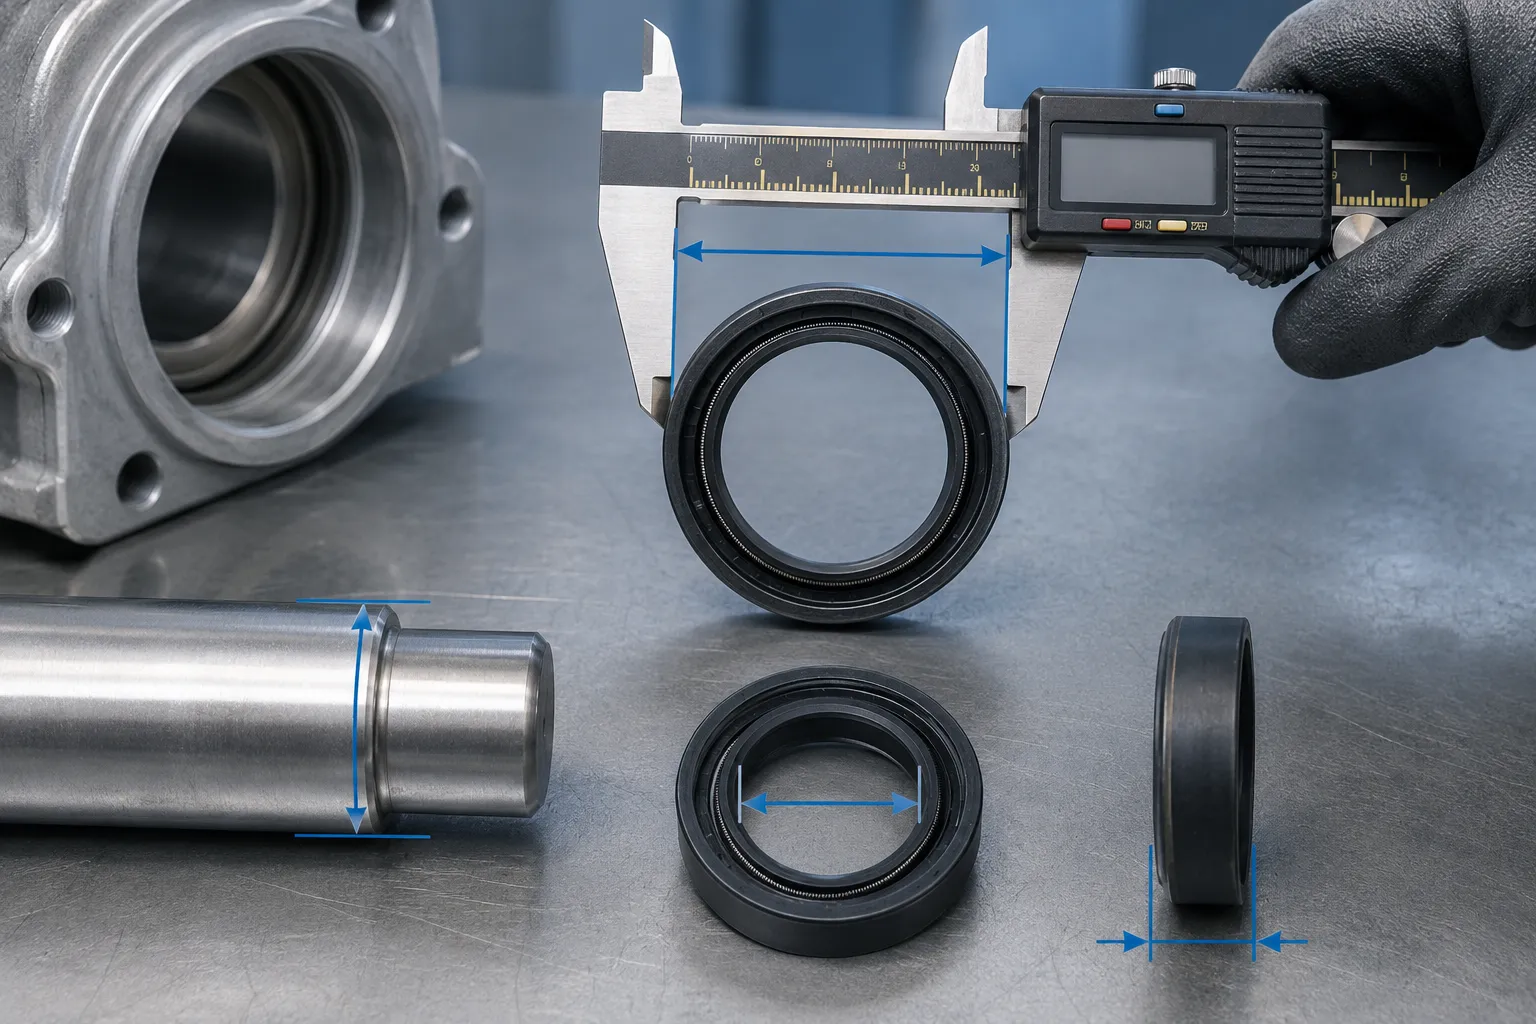
For most standard rotary oil seals, the three main dimensions are:
ID × OD × Width
For example:
50 × 72 × 10 mm
This usually means:
ID: 50 mm inner diameter, matching the shaft diameter
OD: 72 mm outer diameter, matching the housing bore
Width: 10 mm seal width
These dimensions are essential, but they are not enough by themselves.
The replacement seal should also match the original structure, material, lip direction, outer diameter design, and intended operating condition.
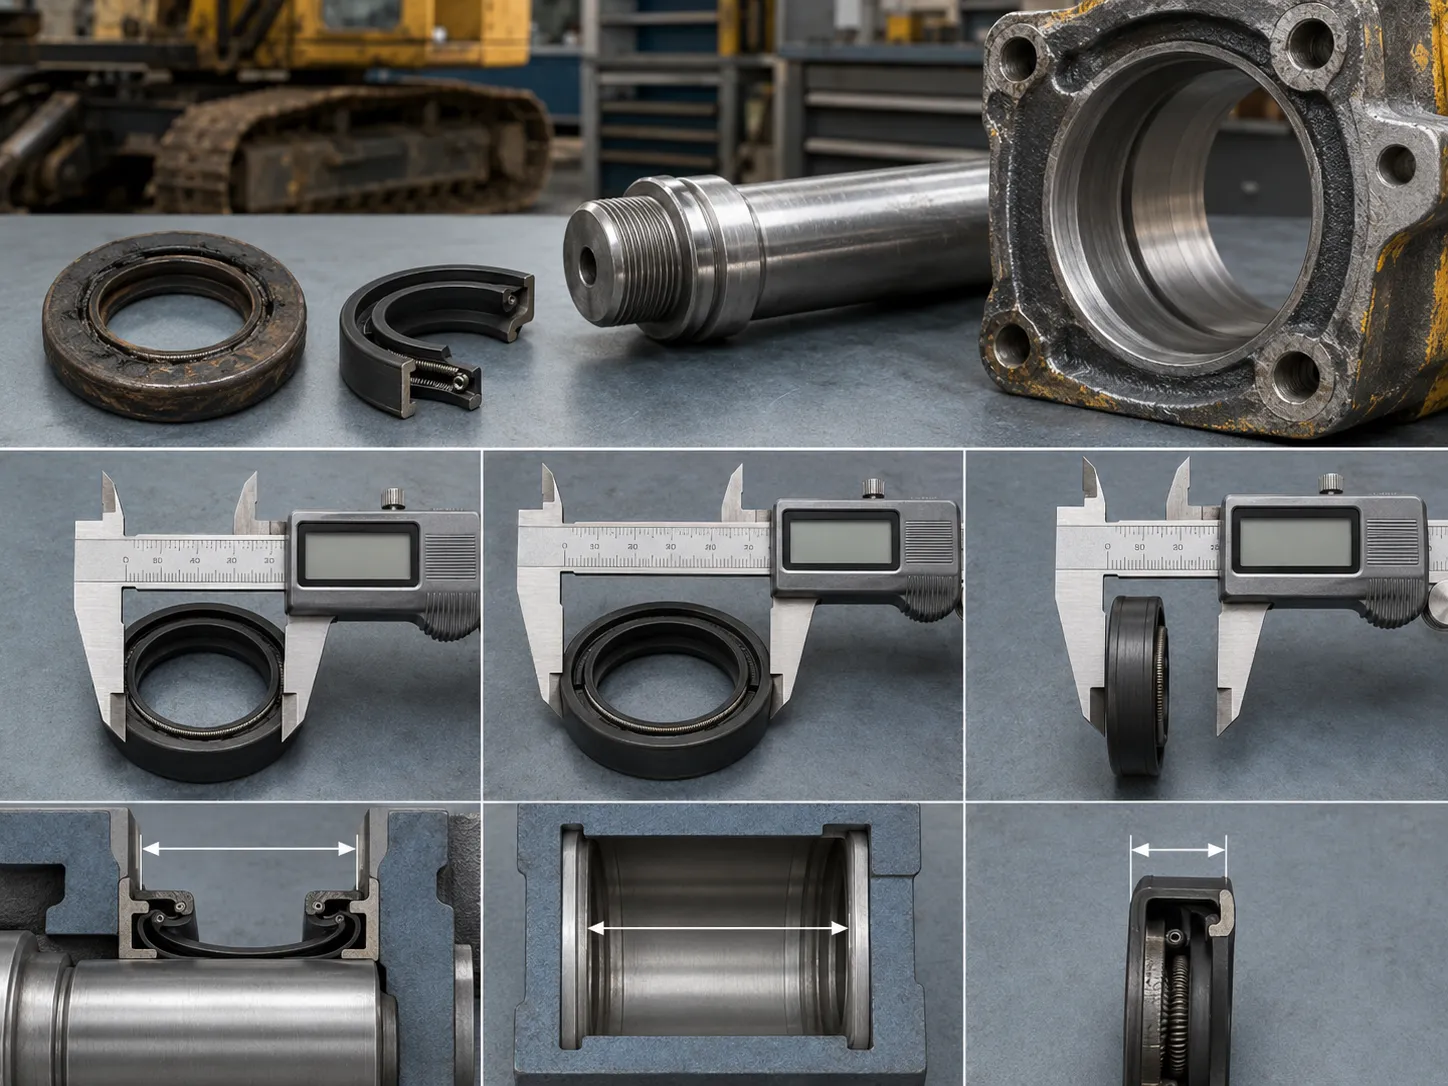
Step 1: Measure the Shaft Diameter
Measure the shaft where the main sealing lip contacts it.
Do not measure a heavily worn groove and assume that measurement is the original shaft diameter.
Inspect the shaft for:
Wear grooves
Rust
Corrosion
Pitting
Scratches
Sharp edges
Thread damage
Spline damage
Excessive runout
Bearing-related movement
A new oil seal can leak quickly if it is installed over a damaged shaft surface.
Step 2: Measure the Housing Bore
Measure the housing bore where the outside diameter of the seal sits.
Check whether the bore is:
Round
Clean
Free from deep scratches
Free from corrosion
Free from old sealant buildup
Suitable for a rubber-covered outer diameter
Suitable for a metal-cased press fit
Free from loose fit or distortion
A worn or damaged housing bore may cause leakage around the outer diameter of the seal.
Step 3: Measure the Seal Width
Measure the width of the removed seal and confirm the available installation depth.
The replacement seal must fit inside the housing without interfering with:
Bearings
Retaining rings
Gear faces
Spacers
Flanges
Covers
Other seals
Shaft shoulders
A seal with the correct ID and OD may still be wrong if the width or lip-contact position does not match the assembly.
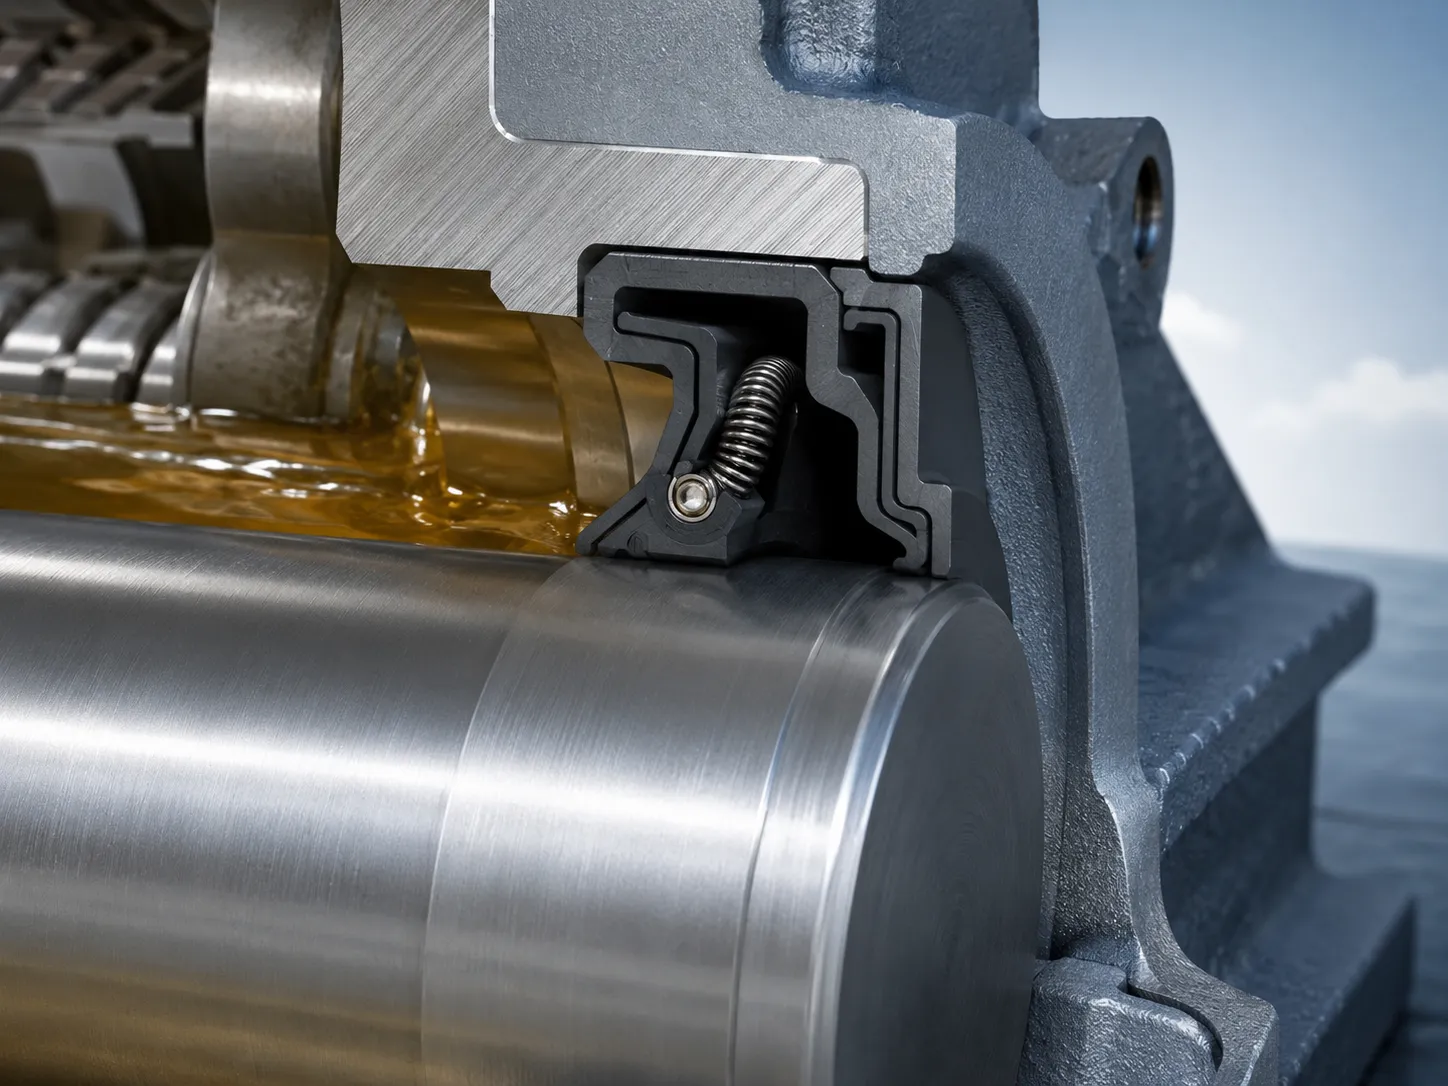
Step 4: Compare the Cross-Section
Look at the seal from both sides.
Check for:
Main sealing lip
Garter spring
Auxiliary dust lip
Rubber-covered outer diameter
Metal-cased outer diameter
PTFE lip structure
Multiple lips
Directional lip markings
Special pressure-support features
Special sealing edge or contact position
A photo of the seal cross-section can be very useful when no OEM reference is available.
How to Confirm the Correct Seal Type
The same size can be available in different oil seal types.
Common market descriptions include:
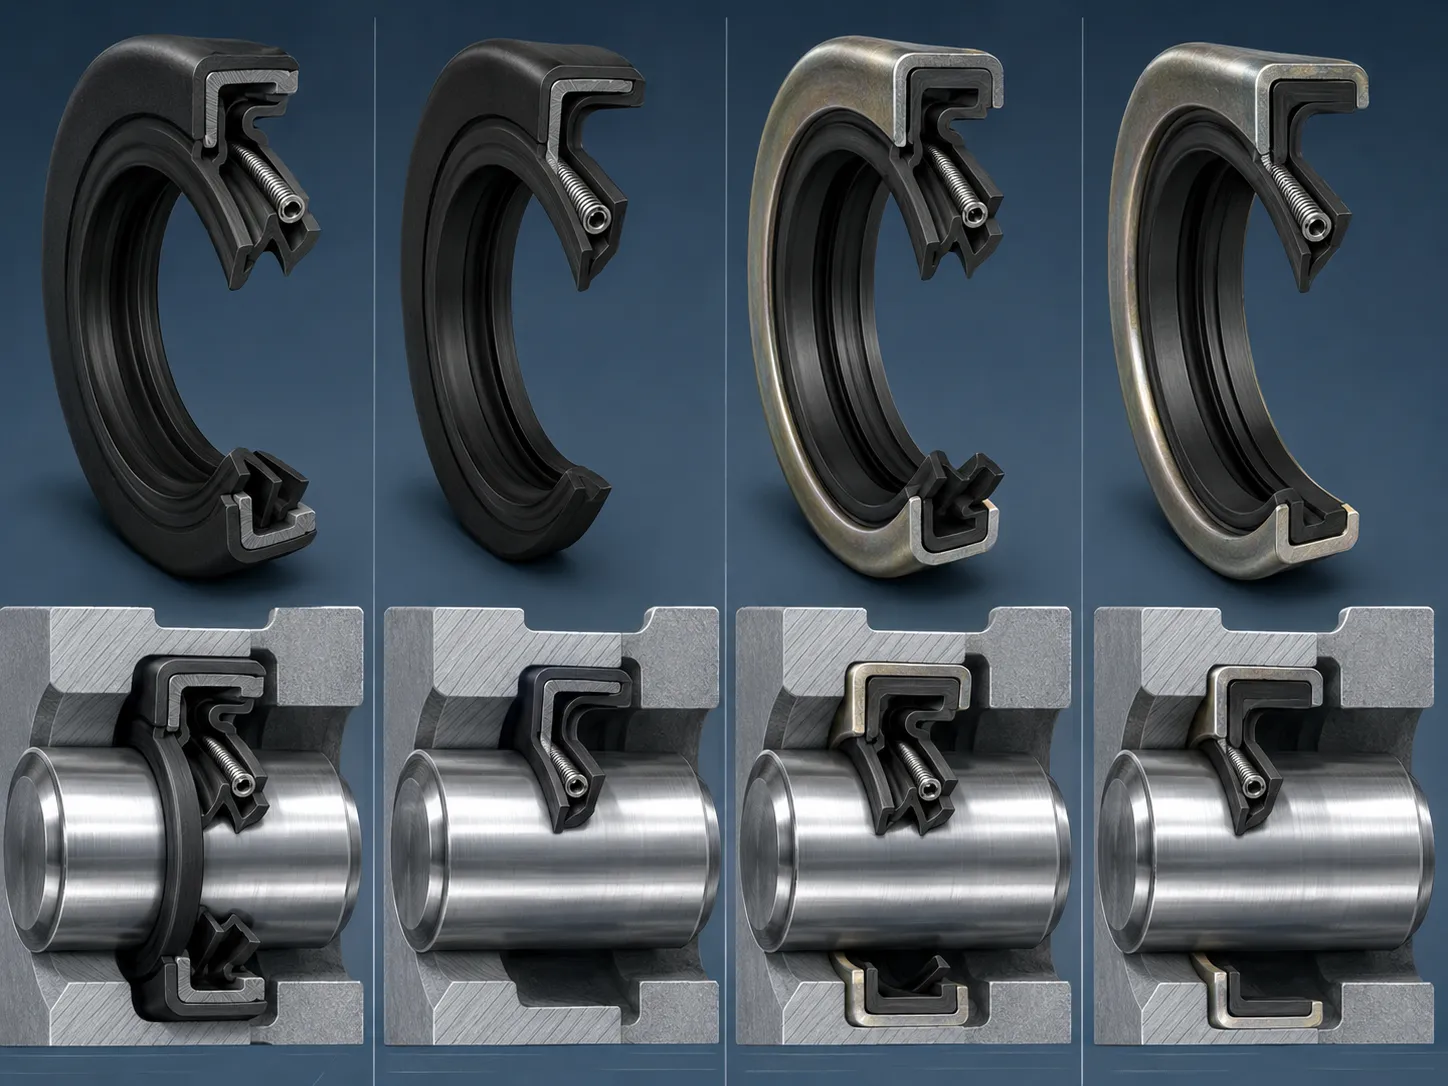
Type | Common Structure | Typical Application Condition |
|---|---|---|
SC | Main sealing lip, rubber-covered OD | Cleaner and more protected oil-retention applications |
TC | Main sealing lip plus dust lip, rubber-covered OD | Moderate dust, splash, and external contamination exposure |
SB | Main sealing lip, metal outer case | Stable and accurately machined housing bores |
TB | Main sealing lip plus dust lip, metal outer case | Metal housings with added contamination protection |
These type codes are widely used, but naming and cross-section details can vary by supplier.
For example, two seals labeled TC may have different spring arrangements, material compounds, lip geometry, outer-diameter details, or pressure capability.
The code should be used as a starting point rather than the final specification.
When the old seal is available, compare:
Number of lips
Spring location
Outer diameter construction
Width
Lip thickness
Contact position
Material appearance
Any printed markings
Installation direction
How to Choose the Right Oil Seal Material for JCB Equipment
Oil seal material should be selected according to the actual operating condition.
Common materials may include:
NBR
ACM
FKM
PTFE
Silicone
HNBR
Other application-specific elastomers or engineered polymers
NBR
NBR is widely used for many standard mineral-oil, grease, and general-purpose sealing applications.
It can be a practical choice when the temperature, fluid, shaft speed, and working environment are within the normal range for the material.
ACM
ACM is often considered for hot lubricating-oil applications, including selected engine and transmission sealing positions.
It may be useful where standard NBR heat resistance is not sufficient but the full chemical resistance of FKM is not required.
FKM
FKM is commonly used for higher-temperature, fuel-exposed, synthetic-lubricant, or more demanding oil-sealing applications.
It may be suitable for selected engine, transmission, gearbox, and industrial applications where long-term heat aging or aggressive fluid exposure is a concern.
PTFE
PTFE may be used for specialized high-speed, high-temperature, low-friction, chemically demanding, or advanced rotary-seal applications.
PTFE seals often require specific shaft preparation, installation tools, and assembly procedures.
They should not be treated as a direct universal replacement for a standard spring-loaded elastomer oil seal.
Material Is Only One Part of the Decision
A material upgrade cannot correct:
A grooved shaft
A damaged housing bore
Worn bearings
Excessive shaft movement
A blocked breather
Incorrect installation depth
Severe contamination
High pressure beyond the seal design
Wrong lip direction
Poor installation technique
The correct material must be combined with the correct seal structure and a stable sealing environment.
Check Shaft, Housing, and Bearing Condition Before Replacing the Seal
Many repeat leaks are caused by a mechanical condition that remains after the old seal has been replaced.
Before installing a new seal, check the surrounding components.
Shaft Surface Condition
Inspect for:
Wear grooves
Pitting
Corrosion
Scratches
Rough machining marks
Splines or threads that may damage the lip
Sharp lead-in edges
Excessive runout
Misalignment
A shaft repair sleeve, shaft repair, repositioned lip contact, or shaft replacement may be needed when the sealing surface is damaged.
Housing Bore Condition
Check the bore for:
Corrosion
Scratches
Out-of-round condition
Loose seal fit
Cracks
Old sealant
Damage from previous seal removal
Improper dimensions
Distorted retaining surfaces
A rubber-covered outer diameter may provide better static sealing in some slightly imperfect bores, but it should not be used as a shortcut for a severely damaged housing.
Bearing and Shaft Movement
Worn bearings can allow shaft movement that destroys a new seal lip.
Look for:
Side play
Radial movement
Vibration
Unusual noise
Rough rotation
Heat buildup
Repeated seal failure
Uneven lip wear on the old seal
A new seal will not solve a bearing problem.
Breather and Pressure Condition
Gearboxes, axles, differentials, and other housings often use breathers or vents to manage pressure changes.
A blocked breather can increase internal pressure and force lubricant past a good seal.
Inspect the breather before assuming the seal alone caused the leak.
Common Mistakes When Ordering a JCB Oil Seal
Ordering Only by Machine Model
One machine may use many different seals.
Always identify the exact assembly and confirm the dimensions and structure.
Ordering Only by ID, OD, and Width
Dimensions are essential, but they do not confirm:
Material
Lip arrangement
Spring requirement
Outer diameter structure
Pressure suitability
Dust-lip requirement
Shaft-contact position
Installation direction
Replacing a Double-Lip Seal With a Single-Lip Seal
A single-lip seal may fit physically but may provide less contamination protection in an exposed axle, hub, gearbox, or outdoor application.
Check whether the original design used an auxiliary dust lip or a more specialized exclusion system.
Selecting a Premium Material Without Checking the Root Cause
FKM or PTFE may be useful in some applications, but they cannot correct shaft damage, bearing play, pressure problems, or incorrect installation.
Confirm why the old seal failed before changing the material.
Ignoring the Old Seal Cross-Section
The old seal can provide valuable identification details.
Take photos of both sides before removal and keep the sample where possible.
Ignoring Installation Direction
For many standard rotary oil seals, the main sealing lip and garter spring face the lubricant side.
However, special PTFE, directional, pressure, contamination-exclusion, or dual-seal arrangements may require a different orientation.
Always confirm the actual seal design before installation.
A Practical JCB Oil Seal Identification Checklist
Before requesting a quote or replacement recommendation, collect the following information.
Information Needed | Why It Matters |
Equipment model | Helps identify the machine family |
Serial number or serial range | Helps distinguish version changes where available |
Exact component location | Identifies whether the seal is for an axle, hub, gearbox, pump, engine, or other assembly |
OEM reference or old seal marking | Provides a useful starting point for matching |
Seal ID, OD, and width | Confirms the main dimensions |
Seal photos from both sides | Helps identify lip structure, spring position, and outer diameter type |
Shaft and housing photos | Helps identify wear, corrosion, and fitment risks |
Fluid type | Supports correct material selection |
Temperature and operating environment | Supports material and lip-design selection |
Shaft speed or machine function | Helps identify whether a standard seal is suitable |
Quantity requirement | Determines whether the order is a stock replacement, trial order, or custom project |
Packaging requirement | Helps avoid warehouse and installation mistakes |
This information does not need to be collected perfectly before the first inquiry.
However, the more complete the information, the lower the risk of ordering a seal that fits dimensionally but does not perform correctly.
What to Send a Supplier for Replacement Confirmation
A clear replacement inquiry can save time and reduce wrong-part risk.
A useful request may include:
Equipment: JCB machine, exact model and serial information where available
Assembly location: rear axle hub / front differential / gearbox output / hydraulic pump / engine timing area
Old seal marking: provide photo or readable code
Dimensions: ID × OD × width
Seal structure: single lip, double lip, rubber OD, metal case, or unknown
Fluid: gear oil, transmission fluid, hydraulic oil, engine oil, or grease
Operating condition: temperature, contamination exposure, shaft speed, pressure, and outdoor use
Shaft and housing condition: smooth, worn groove, corrosion, damaged bore, or unknown
Quantity: sample quantity and bulk quantity
Requirement: confirm drawing or sample before production if the item is non-standard
A supplier should ask questions when important information is missing.
A quick quotation without confirming the assembly, dimensions, material, or seal structure may be suitable only for a very standard low-risk replacement item.
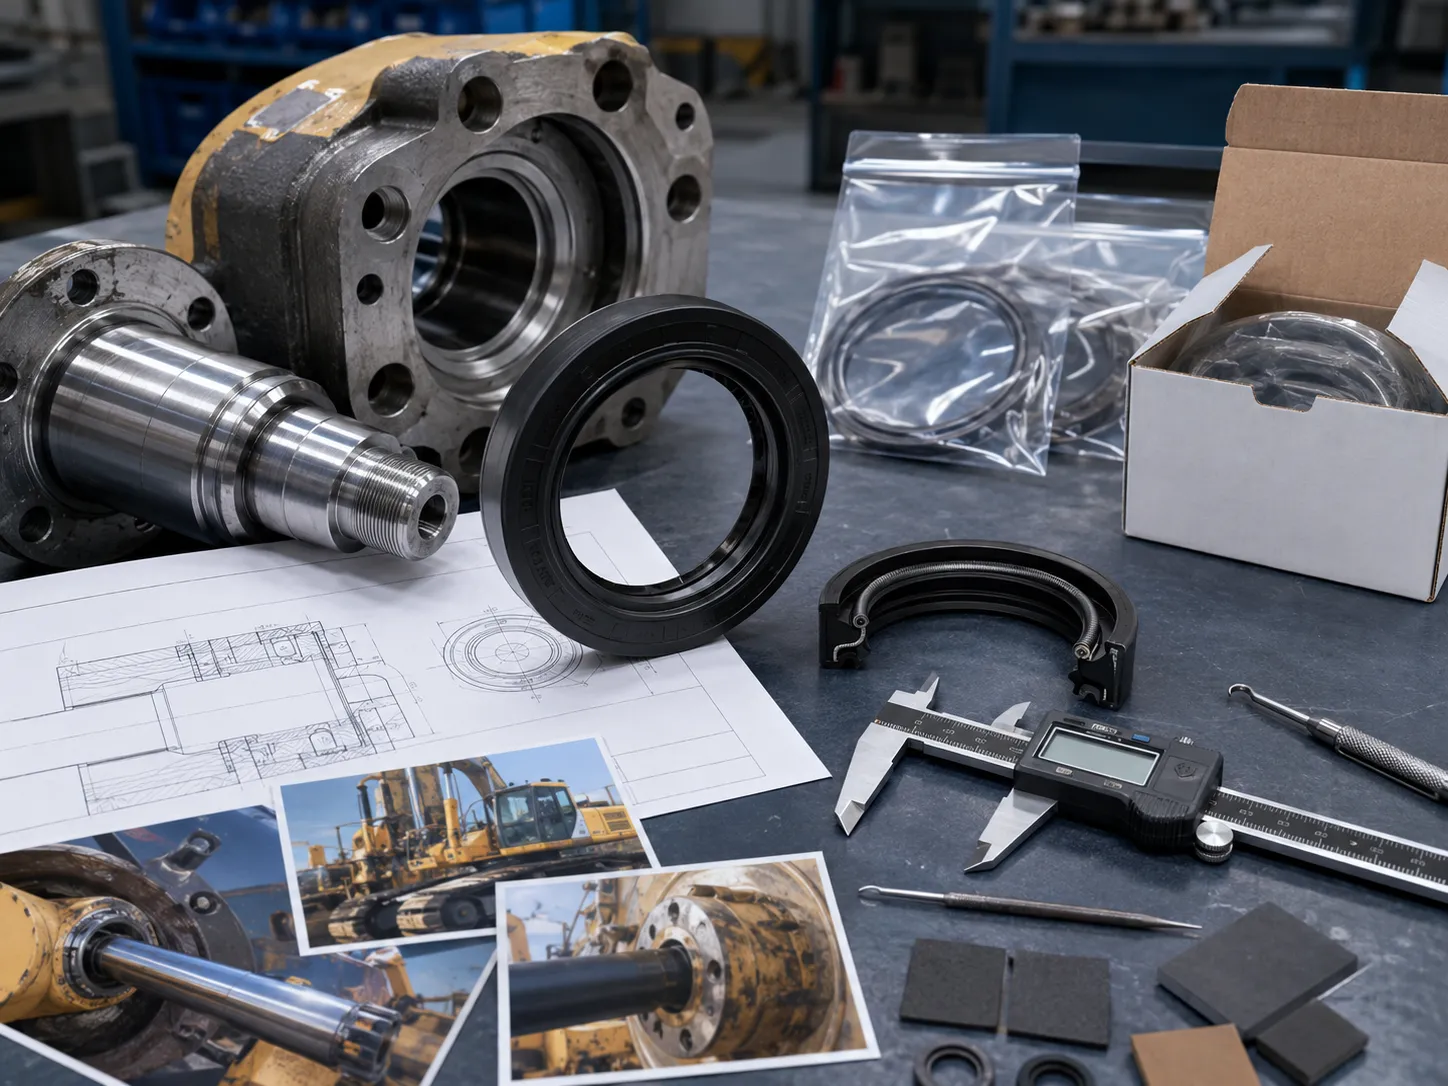
When a Standard Replacement Seal May Not Be Enough
A standard catalog oil seal may not be suitable when the application involves:
Non-standard dimensions
Special shaft geometry
Limited installation depth
High shaft speed
High temperature
Fuel or aggressive chemical exposure
High internal pressure
Heavy dust or mud exposure
Water immersion
Severe shaft wear
Damaged housing bore
Repeated seal failure
Obsolete or unavailable OEM replacement
Custom lip contact position
Special spring material
Heavy-duty wheel-end operation
In these cases, the solution may involve:
A different seal material
A different lip profile
A dust-lip upgrade
A PTFE seal
A pressure-capable seal
A cassette or heavy-duty wheel seal
A shaft repair sleeve
A repositioned sealing lip
A custom size
A drawing-based replacement design
The objective is not simply to find a seal with the same dimensions.
The objective is to restore reliable sealing in the actual working environment.
Conclusion
A JCB oil seal should be identified by the exact assembly, dimensions, lip structure, material, shaft condition, housing condition, fluid, and operating environment.
Machine model information is useful, but it is rarely enough on its own.
For a reliable replacement, first identify the leak location, inspect the old seal, measure ID × OD × width, compare the cross-section, confirm the fluid and operating condition, and inspect the shaft and housing before installing a new seal.
A seal that looks correct may still fail if the material is wrong, the lip structure is unsuitable, the shaft is grooved, the housing bore is damaged, the bearing has excessive movement, or the seal is installed in the wrong direction.
SealVendor can support JCB-equipment oil seal identification through old-sample review, dimensional checks, TC, SC, TB, and SB structure comparison, material selection, OEM-reference matching, drawing review, and custom sealing support for non-standard applications.